Step 3: Register external services
Learn how to register external services.
Register external services for Tax Calculation and Payment Services. You can run these scripts from the Developer Console in an Execute Anonymous window or by the method you choose when registering other services as part of the site setup before starting the connector setup.
Important: The Digital River connector currently only supports a Tax Type of Net. Ensure the tax type is set to Net BEFORE activating your store, as you cannot change it afterward.
Tax integration service
The next sections provide details on how to use the tax integration service.
Using the Cart Calculate API Tax extensions
If you are using the Cart Calculate API extensions, follow these steps to register the Digital River tax extension.
Prerequisites
Ensure that you have enabled the Cart Calculate API for the webstore.
Install the Salesforce Commerce plugin for Salesforce CLI.
Steps to register
Note: These instructions assume you are using Salesforce CLI to register the tax integration. It is also possible to register the integration through alternative methods which are not documented here. Refer to salesforce’s documentation if you prefer this approach.
Run this command to register the tax integration class:
sfdx commerce:extension:register --targetusername YOUR_ORG_USERNAME --apex-class-name DRB2B_TaxCalculationServiceCartCalculate --extension-point-name Commerce_Domain_Tax_CartCalculator --registered-extension-name DRB2B_TaxCalculationServiceCartCalculateLink the newly registered tax integration to the storefront. From the store’s Administration menu, select Tax Calculation. Under Custom Provider, link the newly registered DRB2B_TaxCalculationServiceCartCalculate in ‘Extension: Tax - Cart & Checkout Calculator.’

Alternatively you can use Salesforce CLI to map the extension to the store using the following command:
Using the Aura integrations
If you are using the Aura integrations, follow the steps in this section to register the tax integration. This is a case where you have not registered the external service for tax integration:
Use the following script to insert the Tax Calculation Apex class that comes with the package into
RegisteredExternalService. To use the script, modify the<<storeName>>variable before running.Verify that the
Tax Calculation Apex class IDis registered with thesoqlquery below. TheExternalServiceProviderIdshould match the Tax Calculation Apex ClassDRB2B_CartTaxCalculationsID in the org.Link the newly registered tax integration to the storefront. From the store’s Administration menu, select Tax Calculation. Under Integration, link the newly registered
DR_COMPUTE_TAXESor whatever name you gave the integration in the script in step 2.
If you have already registered the external service for tax integration:
Run the following script to update the Tax Integration service to point to the Tax Calculation integration class from the Salesforce Lightning app.
Verify that the
Tax Calculation Apex class IDis registered by making the belowsoqlquery. TheExternalServiceProviderIdshould match the Tax Calculation Apex ClassDRB2B_CartTaxCalculationsID in the org.Link the newly registered tax integration to the storefront. From the store’s Administration menu, select Tax Calculation. Under Integration, link the newly registered
DR_COMPUTE_TAXESor whatever name you gave the integration in the script in step 2.
Payment service
Use the following steps to create the Payment Gateway:
Capture the
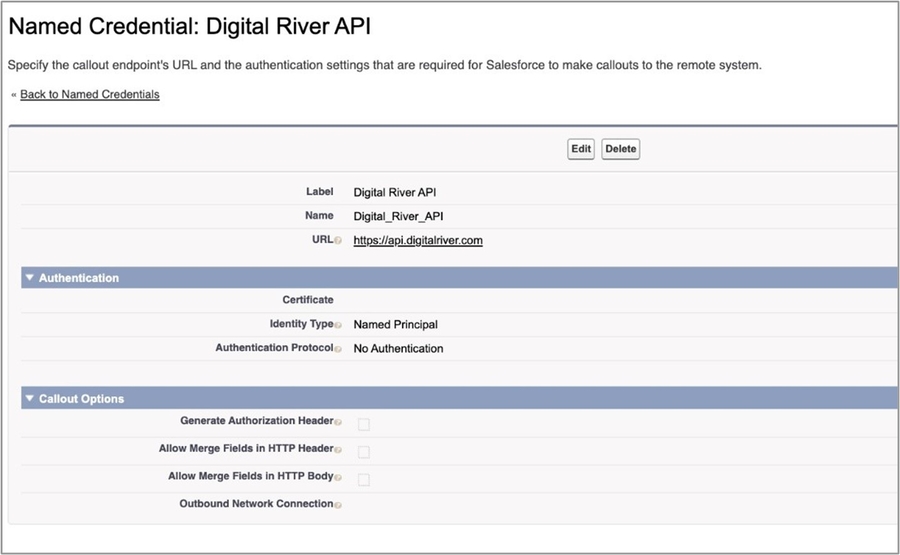
WebStore Id. This will be used in the script in step 4.From the Named Credential menu, choose the New Legacy option. Create a Named Credential for Digital River with the following details:
Label: Digital River API
Name: Digital_River_API
URL: https://api.digitalriver.com
Identity Type: Named Principal
Authentication Protocol: No Authentication
Generate Authorization Header: false

Create a Payment Gateway Provider:
Sign in to Workbench from your commerce org.
Go to the Data tab and select Insert.
Go to the Object Type and select PaymentGatewayProvider.
Select Single Record and click Next.
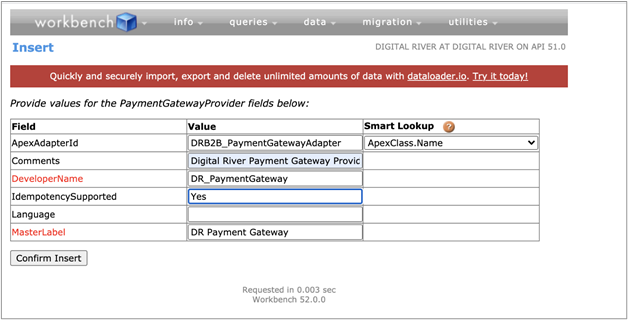
Fill in the fields using your Payment Gateway Adapter information.
Field nameExampleApexAdapterId
ID of Payment Gateway Adapter Apex class
DRB2B_PaymentGatewayAdapterDeveloperName
DR_PaymentGateway
IdempotencySupported
Yes
MasterLabel
DR Payment Gateway
Comments
Digital River Payment Gateway Provider
Click Confirm Insert.

Set up Payment Gateway and insert a
StoreIntegratedServicerecord for payment by executing the below script. Be sure to update theWebstoreIDto the one captured in step 1 of this section.
Last updated