# User guide
## Product management
Product management consists of two aspects. First, you must configure the required product attributes for each product/SKU.
Next, you can choose to do one of the following:
* Use the[ SKU sync job](#jobs) to sync the products to Digital River OR
* Enable the [Digital River Send Product Details preference](https://docs.digitalriver.com/salesforce-b2c-link-cartridge/salesforce-b2c-link-cartridge-3.3/configure-the-salesforce-b2c-link-cartridge#custom-site-preferences). This action sends product attributes in the Digital River checkout request.
This section provides details on how to complete all of these steps.
### Step 1. Configure the required product attributes
Before Digital River can process the SKUs, you must first configure all the products with the required tax attributes and Digital River custom attributes and then send them to Digital River. You must configure this data for valid tax calculations. If you do not configure these attributes, errors will occur when you run the SKU export job or create a Digital River checkout.
Digital River recommends using [SKU groups](https://docs.digitalriver.com/digital-river-api/product-management/setting-up-sku-groups) to store compliance data for new implementations. By using [SKU groups](https://docs.digitalriver.com/digital-river-api/product-management/setting-up-sku-groups), you do not need to populate the [Tax Class and Digital River ECCN attributes](https://docs.digitalriver.com/salesforce-b2c-link-cartridge/salesforce-b2c-link-cartridge-3.3/configure-the-salesforce-b2c-link-cartridge#custom-site-preferences). However, if you assign a SKU group to a Digital product, you must set the [Digital River Digital Product attribute](https://docs.digitalriver.com/salesforce-b2c-link-cartridge/salesforce-b2c-link-cartridge-3.3/configure-the-salesforce-b2c-link-cartridge#custom-site-preferences) in the product for the cartridge to function properly.
{% hint style="info" %}
**Note**: You must configure SKU groups on applicable products in some cases. These are:
1. If your Digital River account is configured for Landed Costs or Global Logistics.
2. If you are [sending product details in the checkout](#option-2-enable-the-digital-river-send-product-details-drsendproductdetails-preference) instead of using the SKU sync.
The cartridge code processes duty charges shown to customers as a separate total price component without additional site configuration. Work with your Digital River project manager to determine the appropriate [SKU groups](https://docs.digitalriver.com/digital-river-api/product-management/setting-up-sku-groups) for your products.
{% endhint %}
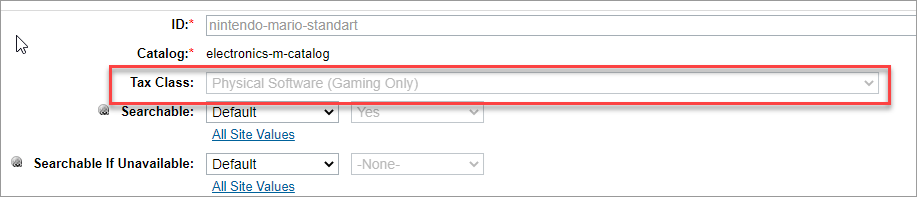
Configure the Tax Class information here:
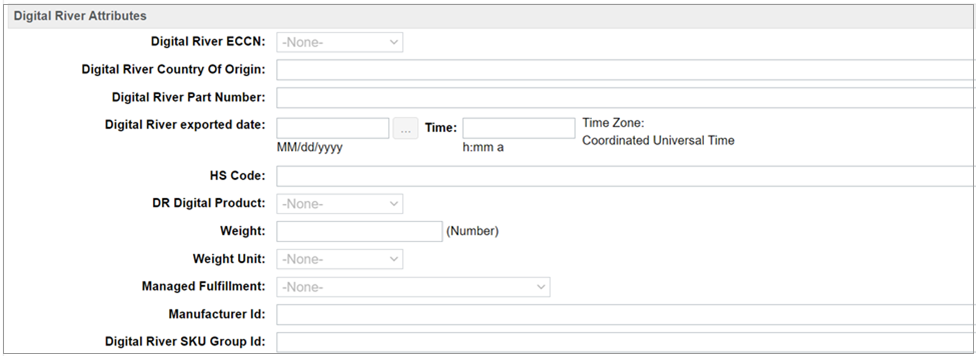
Configure the Digital River custom attributes here:
The following new Digital River product attributes are in the Salesforce B2C Link Cartridge:
* Weight
* Weight Unit
* Managed Fulfillment
* Manufacturer Id
* Digital River Part Number
* Digital River SKU Group Id
* Digital River Digital Product – Physical or Digital
* Digital River Digital Product – Physical or Digital\
**Note:** The cartridge automatically sets this attribute if you use Tax codes. Do not change this manually. However, if you use SKU groups, manually set this attribute to True/Yes for all Digital products. If the tax code is a digital code, ensure that the Tax Codes for Digital Products (`drDigitalProductTaxCodes`) list is stored as the site preference to identify the digital products. After importing the metadata, the default tax codes are populated and can be used out of the box. No additional configuration is needed.
* Digital River Item Breadcrumb
* Digital River Tax Description
{% hint style="info" %}
**Note**: The Digital River Item Breadcrumb and Digital River Tax Description are needed only if you use the [item classification service](https://docs.digitalriver.com/digital-river-api/using-our-services/item-classification) at checkout.
{% endhint %}
Verify the default list by selecting **Sites > Your Site > Site Preferences**, then **Custom Preferences**.
Select **Digital River** in the **Custom Site Preferences Groups** and then scroll down to the **Tax Codes for Digital Products (drDigitalProductTaxCodes)** preference.

### Step 2. Use the SKU sync job OR enable Digital River Send Product Details
After configuring the required product attributes for each product/SKU, you can choose to one of the following:
* Use the SKU sync job to sync the products to Digital River OR
* Enable the Digital River Send Product Details preference. This action sends product attributes in the Digital River checkout request.
#### Option 1: Use the SKU sync job to sync the products to Digital River
After setting the Tax Class and ECCN, or SKU group on the product, ensure the SKU creation job is run. Ensure the DR Digital Product field on the Digital River Attributes page (see example screen above) appears in the product’s attributes and is set to Yes for digital products.
If you use this option, remember to set the Digital River Send Product Details (drSendProductDetails) preference to false in the Digital River Custom Site Preferences Group.
#### Option 2: Enable the Digital River Send Product Details (`drSendProductDetails`) preference
By default, the Digital River Send Product Details (`drSendProductDetails`) preference is set to true in the Digital River Custom Site Preferences Group. Product attributes are sent in the Digital River checkout request with this preference enabled. Make sure to use [SKU groups](https://docs.digitalriver.com/digital-river-api/product-management/setting-up-sku-groups) if you choose to use this option.
## Jobs
After configuring the products, you must sync the data to Digital River. The cartridge provides the following jobs to sync products. We recommend that you schedule these jobs to run regularly.
* The **DigitalRiver\_DeltaSkuUpdate** job will iterate through all products but send SKU data only for those that haven’t been sent to Digital River or modified afterward. We recommend you use this job for product data export.
* The **DigitalRiver\_DeltaSkuUpdateOnButton** is provided for exclusive occasions when there is a necessity to grant a merchant representative the possibility to request product export to Digital River without providing authority to manage jobs. Schedule this job to check periodically whether a merchant representative requested a SKU. If such was requested, an update will be made (same as the **DigitalRiver\_DeltaSkuUpdate** job does). A merchant can force a product sync using the "Request Delta SKU Update" option in the Merchant Tools / Digital River. See Digital River Merchant Tools available in Business Manager for more details.
* The **DigitalRiver\_FullSkuUpdate** job will iterate through all products and send SKU data for all products regardless of whether or not they have been updated to Digital River. We recommend you use this job for product data export.
* The **DigitalRiver\_FullSkuUpdateOnButton** job is provided for exclusive occasions when there is a necessity to grant a merchant representative the possibility to request an all products export regardless of whether or not they have been updated to Digital River without providing authority to manage jobs. Schedule this job to check periodically whether a merchant representative requested a SKU. If such was requested, an update will be made (same as the **DigitalRiver\_FullSkuUpdate** job does). A merchant can force a product sync using the "Request All SKU Update" option in the Merchant Tools / Digital River. See Digital River Merchant Tools available in Business Manager for more details.
* The LINK Cartridge adds the `drExportedDate` attribute to the product. The SKU update jobs update this attribute each time the jobs run.
* The [**DigitalRiver\_DynamicPricing**](https://docs.digitalriver.com/salesforce-b2c-link-cartridge/salesforce-b2c-link-cartridge-3.3/configure-the-salesforce-b2c-link-cartridge/configure-dynamic-pricing#configure-jobs) job maximizes performance and allows chunked jobs to run in parallel. You can convert the price book to individual target currencies in parallel job steps. A merchant can have a job configuration that lets them specify a base price book and specify the country (the currency is derived from the price book). You can configure the target country price books for generating price books in Country and Currency pairs.
* The [**DigitalRiver\_DynamicPricing\_ProductOptions**](https://docs.digitalriver.com/salesforce-b2c-link-cartridge/salesforce-b2c-link-cartridge-3.3/configure-the-salesforce-b2c-link-cartridge/configure-dynamic-pricing#configure-jobs) job checks every currency in the Country and Currency pairs and adds the currency to the product options.
* The [**Digital River Update Tax Details For Orders**](#storefront-functionality) job gets the [order’s tax details](#storefront-functionality) when run.
* Use the [**DigitalRiver\_CancelAbandonedOrders**](https://docs.digitalriver.com/salesforce-b2c-link-cartridge/salesforce-b2c-link-cartridge-3.3/configure-the-salesforce-b2c-link-cartridge/configure-dynamic-pricing#configure-jobs) job cancel orders where a Digital River order is created but the SFCC order is not created. This is usually due to a failure or cancellation such as:
* SFCC validation logic fails during return from a payment redirect
* SFCC API timeout
* DR API 504 error
* Payment cancelled during a redirect
The job uses the `DROrderCancellationOnErrorRequest` custom object, created during a failure, to store information about the Digital River order that should be cancelled. The custom site preference **Cancellable States** specifies DR order states that are valid for attempted cancellation. The lifecycle of these custom objects is determined by the **Lifespan of DROrderCancellationOnErrorRequest** custom site preference, which specifies the duration in days before the custom object is deleted.
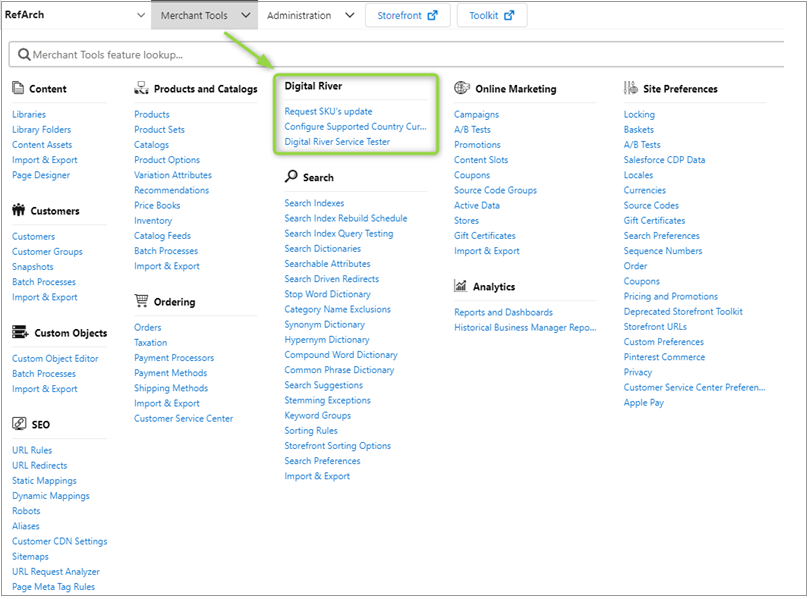
## Digital River merchant tools available in Business Manager
### Merchant tools
We added new Business Manager menu options under Merchant Tools.
* **Request SKUs update -** Click the **Request SKUs update** link under **Digital River**. You'll see the following options:
* **Request delta SKUs update**—Click this button to launch the Digital River SKUs update with the next run of `DigitalRiver_DeltaSkuUpdateOnButton` job. The button will show the corresponding text indicating that you can launch the job or that the job is running.
* **Request all SKUs update**—Click this button to launch the Digital River SKUs update with the next run of `DigitalRiver_FullSkuUpdateOnButton` job.
{% hint style="info" %}
**Note**: Clicking **Request delta SKUs update** or **Request all SKUs update** will not launch the job immediately, but it will raise a flag that must perform an update with the next run of`DigitalRiver_DeltaSkuUpdateOnButton`. If you haven't scheduled the job (in advance) in the Business Manager or (as an administrator) launched the job manually, clicking the button will have no impact at all.
{% endhint %}
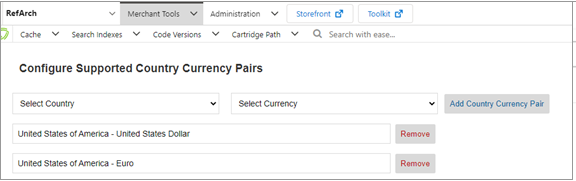
* **Configure supported country and currency pairs -** Click the[ **Configure Supported Country Currency Pairs**](#configure-supported-country-currency-pairs) link under the Digital River module.
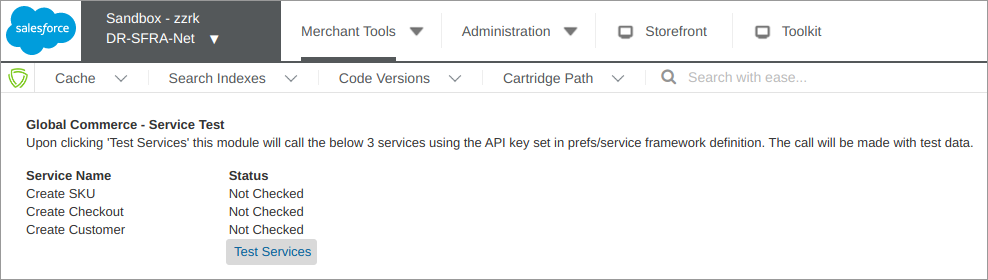
* **Digital River Service Tester**—Click the **Digital River Service Tester** link under **Digital River** and then click **Test Services** to test Digital River service availability. Test Services will make calls to the indicated web services and evaluate the response codes.
## Configure s**upported Country and Currency pairs**
Complete these steps to configure supported Country and Currency pairs. This module appears when the [Dynamic Pricing ](https://docs.digitalriver.com/salesforce-b2c-link-cartridge/salesforce-b2c-link-cartridge-3.3/configure-the-salesforce-b2c-link-cartridge/configure-dynamic-pricing)feature is enabled:
1. Click the **Configure Supported Country Currency Pairs** link under the Digital River module. The Configure Supported Country Currency Pairs page appears.
2. Select the pair country choice from the **Select Country** drop-down. The list has the available countries for your pair.
3. Select the pair currency choice from the **Select Currency** drop-down. The list has the available currencies for your pair.
4. After making your pair choices, click the **Add Country Currency Pair** button to create a new country and currency pair.
5. Click **Remove** to remove any existing pair that is no longer needed.
## Checkout information
When a customer purchases a product, the Checkout page displays the shipping, payment, and order summary information.
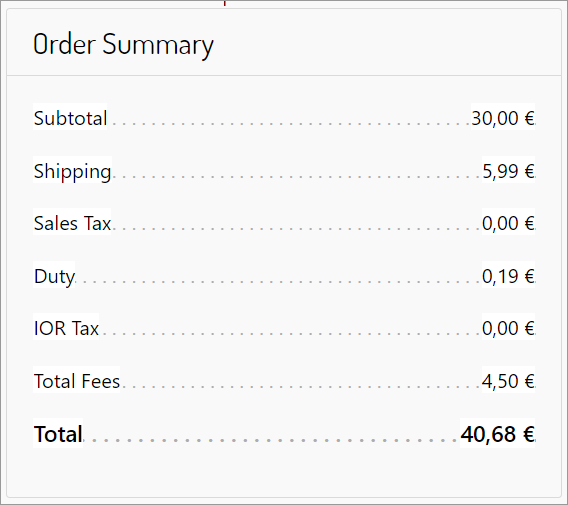
### Order summary
The Order Summary on the Checkout page displays the subtotal, shipping fee, sales tax, total fees (if applicable), and amount total for the order.
If landed cost is enabled, the Order Summary will also include the duty and Importer of Record (IOR) tax if applicable to the order.
{% hint style="info" %}
**Note:** When a Tax Identifier is applied causing a Tax Discount, the “Price includes VAT” message in the Order Summary is removed and replaced with the message “X.XX VAT exempted from order.” The former "Total Tax" text in the summary has been replaced by "Price includes VAT" underneath the total price.
{% endhint %}
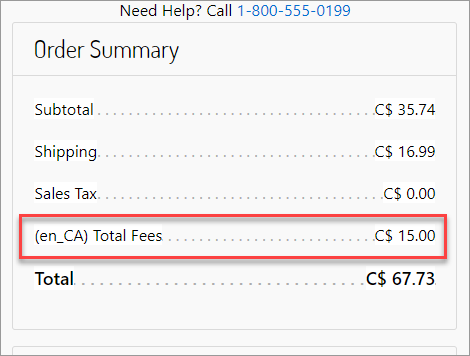
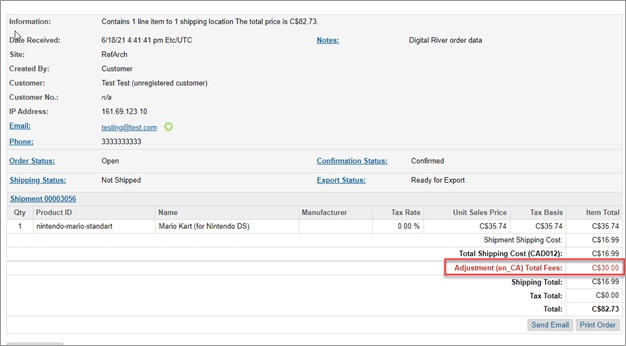
#### Regulatory fees
The creation and management of regulatory fees are outside the scope of the LINK Cartridge. Work with your Digital River Project Manager to set up regulatory fees. Once the fees are configured, the LINK Cartridge displays any applicable fees in the Order Summary when the shopper goes to the Checkout page.
The total fees are added to the purchase order as an adjustment.
Fees will be stored in the Product Line Item objects in the following fields: Fee (`drFeeAmount`), Fee Tax (`drFeeTaxAmount`), and Fee Details (`drFeeDetails`). The Fee Details field contains a JSON array that includes the details of all fees applied to the line item.

### Payment
The customer can update or add a [billing address](#updating-or-adding-a-new-billing-address), an email address, and a phone number. For US-based purchases, the customer can also state whether the [purchase is tax-exempt](#enabling-a-tax-exempt-purchase).
### Updating or adding a new billing address
To update the billing address, click **Update Address** and complete the fields. To add a new billing address, click **Add New**, complete the fields, and click **Save**.
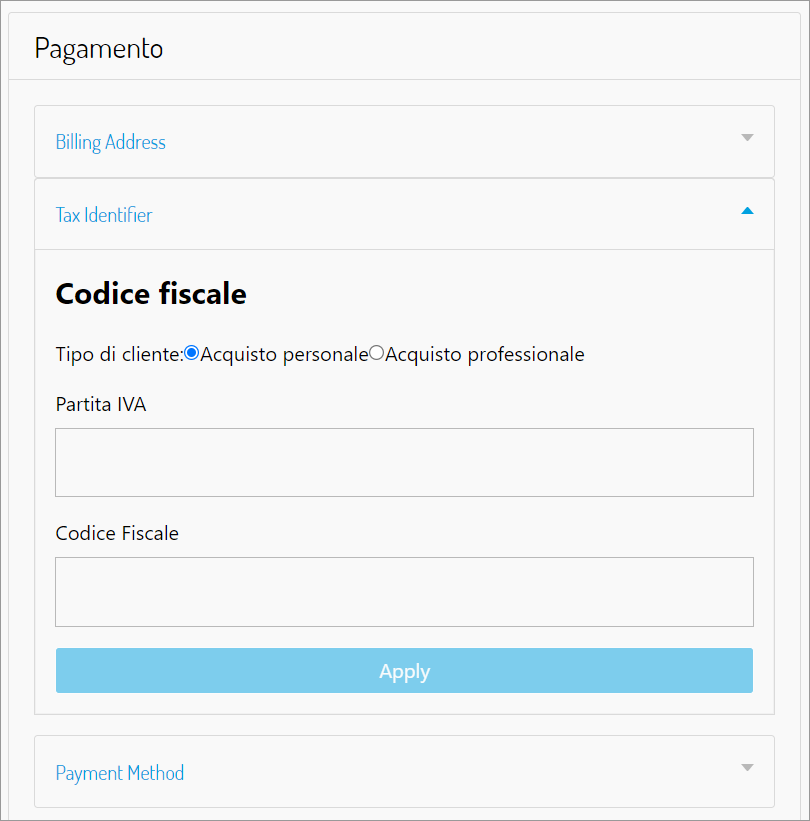
### Adding a tax identifier
For non-US countries, the customer can add one or more Global Tax Identifiers in the Billing section.
The shopper can add and remove tax identifiers and remove from the Checkout page by completing the form and clicking **Apply**.
### Adding new tax certificates (US TEMS)
The Digital River Salesforce B2C LINK Cartridge supports tax-exempt purchases on US storefronts. Authenticated US shoppers can add one or more tax certificates from their My Account. To add the tax certificate, navigate to the My Account page and click **Add New** under the Tax Certificates section, complete the fields, upload the new tax certificate, and click **Save**. See the detailed steps below for more information.
The Tax Certificates card only appears on the My Account page if it is enabled in [Site Preferences](https://docs.digitalriver.com/salesforce-b2c-link-cartridge/salesforce-b2c-link-cartridge-3.3/configure-the-salesforce-b2c-link-cartridge#custom-site-preferences).
The following list shows Digital River's Tax Certificate validation process once a shopper uploads a tax certificate.
1. Validation of the tax certificate is a manual process done by Digital River employees. It is not a real-time determination.
2. Pending that validation, the customer can place an order, which will be treated as if it were a valid certificate (that is, tax-free).
3. If the shopper’s certificate fails validation, their order will not be tax-free when that shopper places another order.
To add existing certificates and add a new tax certificate from the My Account page:
1. Sign in to the storefront.
2. Go to **My Account** and scroll down to **Tax Certificates**.
3. Click **View**. The Tax Certificates page appears and displays all existing certificates.
4. To add a new certificate, click **Add New**.
5. Complete the fields and upload the certificate from the **Add New Certificate** page.
6. Click **Save**. To view taxes at the line-item level of an order. See [Searching for an order](#searching-for-an-order).
### Retrieving a stored payment method
Shoppers can now retrieve their stored credit card when they go to checkout. Stored cards are authenticated using Strong Customer Authentication, as required.
### Thank you page
The Thank you page displays the receipt for the order and the order information. The system will then send a confirmation email to the customer's billing email. You can use the value for the **Order Number** to [search for the order](#searching-for-an-order) in Salesforce.
## Order information
The Digital\_River\_Dropin payment processor provides the following order information in Business Manager:
* To search for an order:
1. Return to Salesforce.
2. Click the **Merchant Tools** tab, and then click **Orders** under **Ordering**.
3. Enter the order number in the **Order Number** field and click **Find**.
4. In the search results, click the link for the order you want to view under **Number**. The Details for Order page appears.
5. To view taxes and fees at the line-item level, click the **Shipment** link, click the link for the product under **Product ID**, and click the **Attributes** tab. The **Digital River** section shows Digital River attributes, including taxes, duties, and fees.
6. If the order is tax-inclusive and promotions have been applied, you can see adjustments (as shown in the example) applied to the order line items and/or shipping. See [this section](#tax-inclusive-sites-promotions-and-tax-identifiers) for more details. \
\
When applicable, You can look at the **General** tab and see the order details, which display the amount of replaced promotions as an **Adjustment - Product Promotions** Additionally, the amount of the Tax Discount applied is as an **Adjustment - Product Tax**.\
\
\
Finally, the **Shipping Tax Discount** is displayed as **Adjustment - Shipping Tax**.\
\
\
\
The **Total Tax Included** value should be zero when a tax identifier is applied.
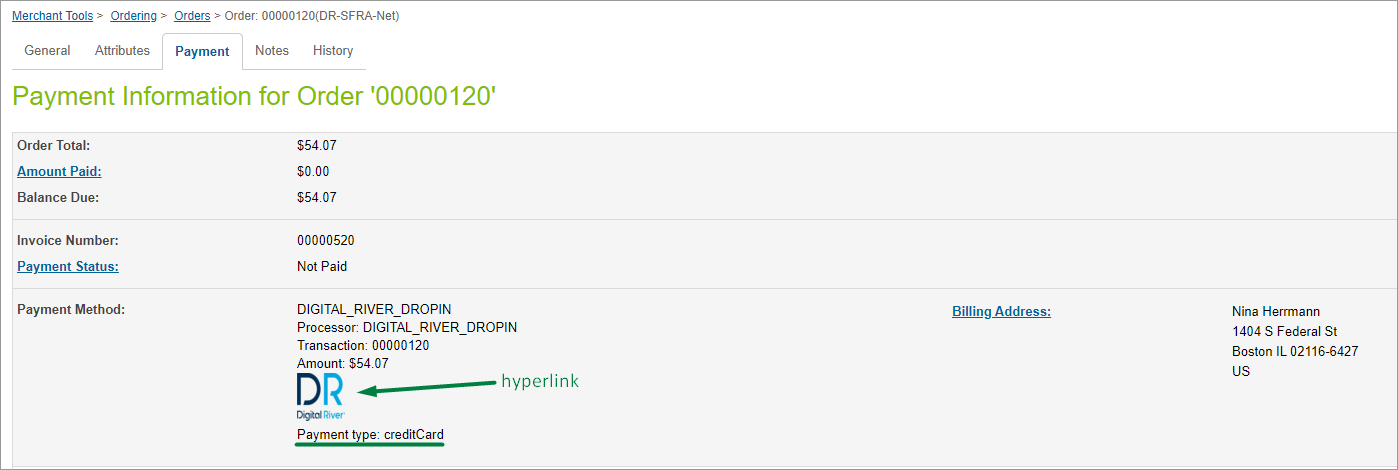
* Select **Merchant Tools**, select **Orders**, choose an order, and click **Payments**.
* Payment type (creditCard, PayPal, and so on) is mentioned.
* Hyperlink to order on Digital River [Dashboard](https://dashboard.digitalriver.com/login).
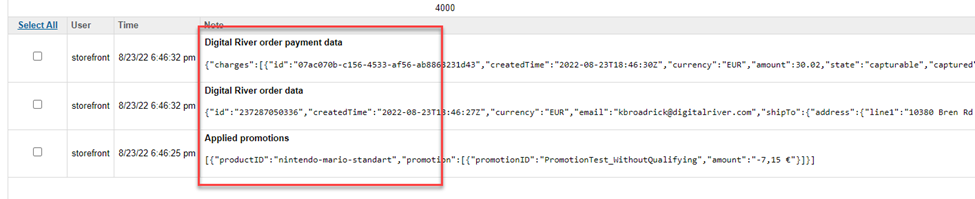
* Select **Merchant Tools**, select **Orders**, choose an order, and click **Notes**. The following occurs
* A Digital River `create order` response is being saved in order notes.
* If the order is tax-inclusive and promotions have been applied, you may see a note added to the order reflecting the original promotions applied. See [this section](#tax-inclusive-sites-promotions-and-tax-identifiers) for more details
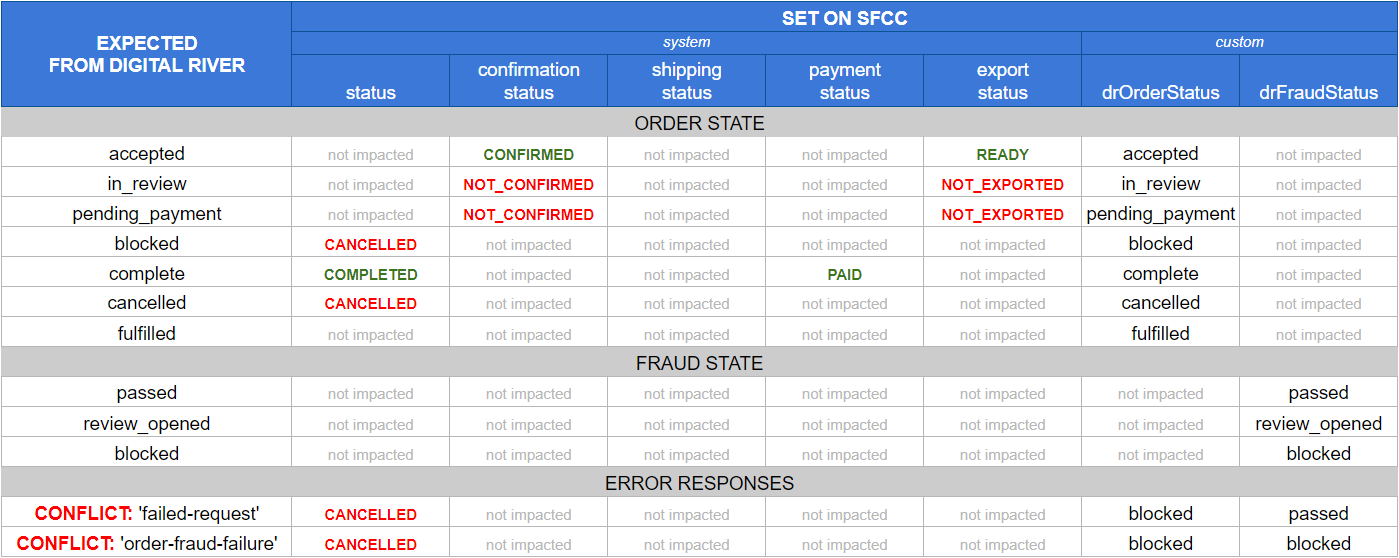
## Order state management
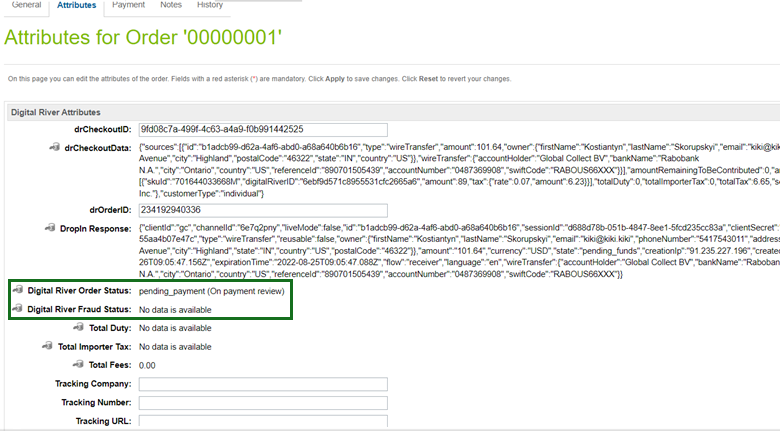
Digital River provides a range of order statuses to track order payments. Each order has a Digital River order status which reflects the current order position within the [order cycle](https://docs.digitalriver.com/digital-river-api/order-management/orders/the-order-lifecycle):
* **accepted**—order has passed checks and is ready for fulfillment
* **in\_review**—order is on fraud review and can’t be fulfilled yet
* **pending\_payment**—order has delayed payment and can’t be fulfilled yet
* **blocked**—order is blocked and must be canceled
* **fulfilled**—order is fulfilled and is waiting for payment capture
* **complete**—order is fulfilled and has been paid
Digital River order status determines further order processing. Also, each order has a Digital River fraud status which shows the state of the order's fraud check:
* **passed**—order has passed the fraud check
* **review\_opened**—order is on fraud review
* **blocked**—order has not passed fraud check
Digital River fraud status doesn’t directly impact order processing and is provided for user reference.
To see Digital River order and fraud states, select **Merchant Tools**, then select **Ordering**, and click **Orders**. Select the **order number** and choose the **Attributes** tab.
Initial Digital River status values are set after order placement and they define order processing scenarios.
| Digital River order status | Order processing scenario |
| ---------------------------------------- | ------------------------------------------------------------------------- |
| accepted | order will be processed |
|
pending\_payment
in\_review
| order will be put on hold until status changes to "accepted" or "blocked" |
| blocked | order will be cancelled |
## Order status management jobs
After the order is placed, the status update is handled through jobs that the Business Manager can run or schedule. We recommend that you schedule these jobs regularly.
* The /**DigitalRiver\_fulfillOrders/** job processes all orders that were shipped or cancelled but still have Digital River order status of “accepted.” For each order, [fulfillment](https://www.digitalriver.com/docs/digital-river-api-reference/#operation/createFulfillments) is sent to Digital River. After all orders are processed their statuses are updated through a separate [Digital River call](https://www.digitalriver.com/docs/digital-river-api-reference/#operation/listOrders). See the[ Order cancellation/fulfillment](#order-cancellation-fulfillment) section for more details.
* The **DigitalRiver\_updateCompletedOrders** job queries all orders that were shipped or canceled but still have a Digital River order status of “accepted” and updates their status through a [Digital River call](https://www.digitalriver.com/docs/digital-river-api-reference/#operation/listOrders). Unlike “DigitalRiver\_fulfillOrders” this job doesn’t send fulfillments to Digital River and is applicable only in combination with other integrations when [drOrderHelper.notifyOrderFulfillment](#drorderhelper) or [drOrderHelper.notifyOrderCancellation](#drorderhelper) functions are injected into scripts responsible for shipping management/order cancellation.
{% hint style="info" %}
**Important**: Neither `DigitalRiver_fulfillOrders` nor `DigitalRiver_updateCompletedOrders` cancel orders or update shipping in the order management system, but only notify Digital River when the order or line item has been shipped or canceled. Once notified, Digital River will [capture the payment or cancel the charge](https://docs.digitalriver.com/digital-river-api/order-management/informing-digital-river-of-a-fulfillment). You can manage order shipping or cancellation in Business Manager or by other integrations, but it’s not within the scope of this cartridge functionality.
{% endhint %}
* The **DigitalRiver\_updatePendingOrders** job updates the state for all orders with pending statuses (in\_review, pending\_payment, fulfilled) that are waiting for resolution on the DigitalRiver side.
In the following table, you can see all the statuses that you can expect to receive from Digital River and their impact on orders in SFCC for each respective state:
## Order tax details
If you need tax details at the line-item level, run the `DigitalRiver_updateDRTaxDetailsForOrders` job. This job populates the line items on an order with the product and shipping tax breakdowns calculated through Digital River.
{% hint style="info" %}
Note: To run this job you need an internal webhook setup. Work with your Digital River Project Team to ensure that this is configured.
{% endhint %}
This job queries all orders with Digital River statuses of “accepted,” “fulfilled,” and “complete.” It also retrieves the tax details for those orders from Digital River.
Once an order has been processed, the Is Tax Details Populated (`isDRTaxDetailPopulated`) attribute in the order would be set to True.
If there are product or shipping taxes, the Product Tax Details (`drTaxDetail`) or Shipping Tax Details (`drShippingTaxDetail`) attributes in the line item would be populated as shown in following the screenshots:
*Order level example*\
\

*Line item level example*
## Storefront functionality
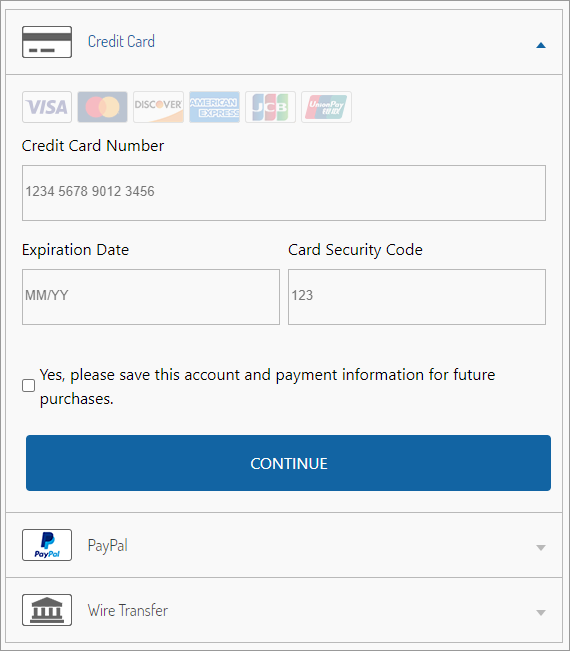
The DigitalRiver.js library replaces the Salesforce built-in payment method forms and also renders Digital River Drop-in payment integration to fulfill the payment process. The payment methods will display on the billing page. The payment methods that display depend on the configuration of your LINK cartridge key by Digital River. Visit our [Drop-in payments](https://docs.digitalriver.com/digital-river-api/payments/payment-integrations-1/drop-in) documentation for an updated listing of payment methods available.
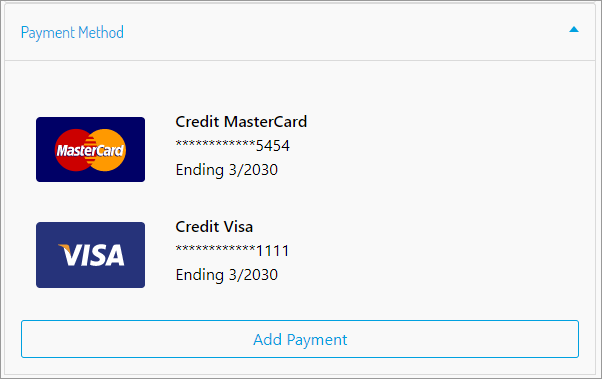
### Payment methods
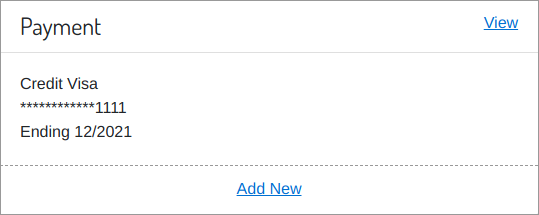
The customer can choose any available payment method. A registered customer can also save a credit card in their wallet. To do this, you need to set the **Yes, please save this account and payment information for future purchases** checkbox. The saved payment method will be visible on the My Account page.
The following image shows how payment methods will appear on the billing page:\
### Adding a new payment method
The Drop-in payments form with the specific configuration will appear when the customer clicks the **Add New** link in the **My Account** section. The form allows the customer to add a new payment method within Drop-in payments and create a new source.
The saved cards will be available in the list of saved cards on the billing page. You can choose any card from the list to pay for purchases in the future.
## Dynamic pricing
With dynamic pricing, the Storefront user interface has some feature-related functionality enhancements.
### Header enhancements
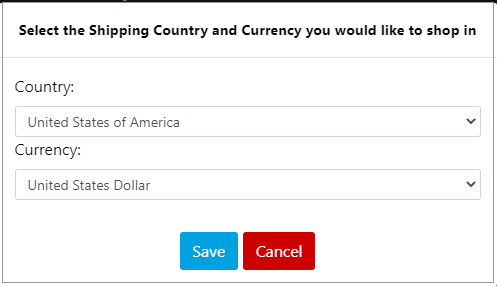
A Change your Shipping Country and Currency link is provided to select the desired shipping country and currency. The link is displayed in the Header below the SFRA’s default locale selector. You can customize the location of this link on your storefront.
When you click **Change your Shipping Country and Currency**, a modal window appears, allowing the shopper to change the shipping country and currency.
The modal displays the currencies available for specific countries and does not display unsupported pairs of [countries and currencies](#configure-supported-country-currency-pairs). To select and save the specific pair, the shopper must click on the **Save** button. When the SFRA’s locale, shipping country, and currency is selected by the customer, the Storefront displays the selected locale language and prices displayed in the selected currency.
On the Product Detail Page (PDP) and Product Listing Page (PLP), the link to select the desired shipping country and currency is displayed in the Header below the SFRA’s default locale selector. As before, you can customize the link location in your storefront. The PDP and PLP reflect the pricing based on the customer selection of shipping country & currency pair. Localized content is displayed as natively configured in the ecosystem.
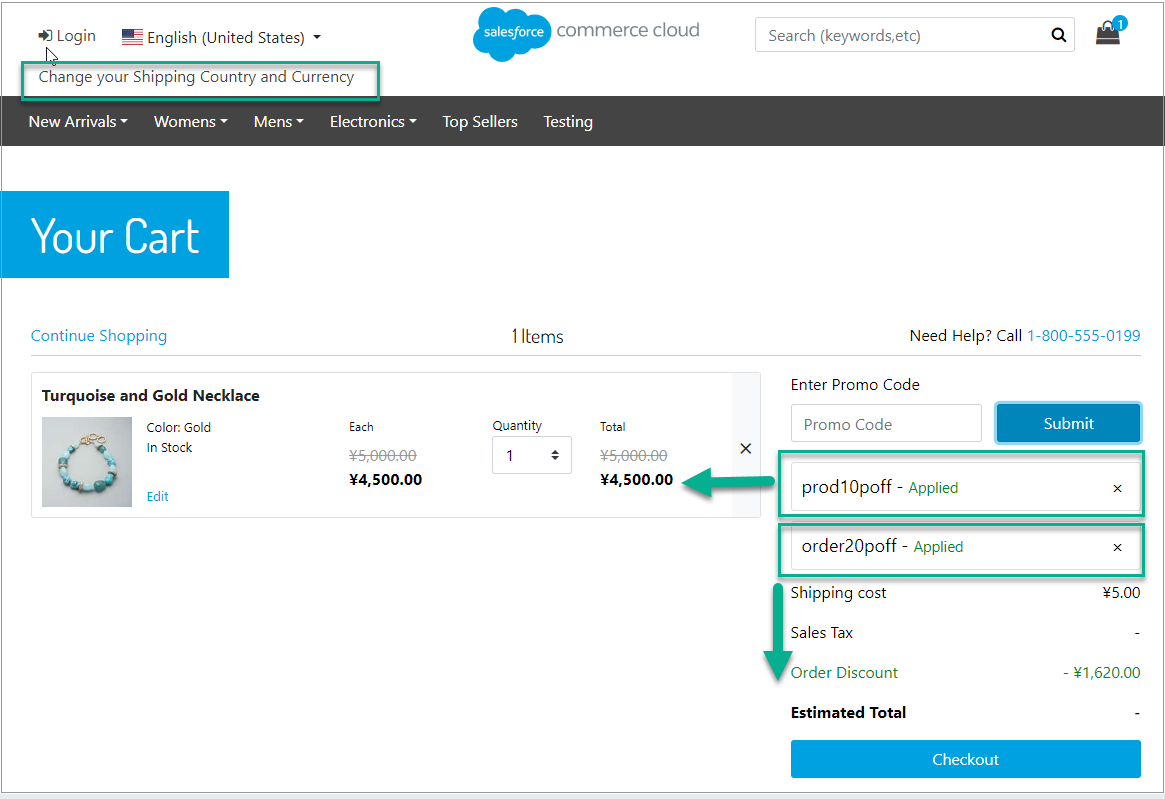
### Cart and Mini-Cart page enhancements
On the Mini-Cart and Cart pages, the dynamic pricing persists and the converted pricing based on country and currency pair selection is still displayed in the price per each unit and the total price of the items.
On the Mini-Cart and Cart page, the shopper can make updates, and the dynamic pricing is still reflected. On the Cart page, the shopper can apply promotions (coupons) to the products from the cart, and the dynamic pricing is still reflected.
### Checkout page enhancements
On the Checkout pages, the dynamic price persists throughout the checkout. The Order Summary section displays accurate dynamic pricing for every entry made for the checkout.
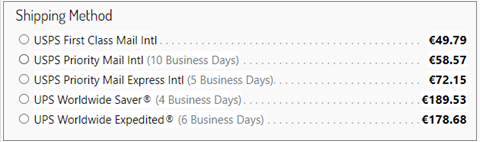
## Digital River shipping options
With global logistics (shipping options), the Storefront user interface has some feature-related functionality enhancements. Shipping options are gathered from the cross-border logistics partner after the shopper enters an address or updates their shipping address.
On the Storefront, in the Checkout – Shipping page, the shopper can view the relevant shipping options based on the shipping country as configured in Business Manager by the merchant. Shipping options are updated if the country or other address data is changed.
The customer can select a shipping option during checkout for their purchase and can change the shipping country during checkout, only if not using the dynamic pricing feature. The chosen shipping method is displayed through the checkout, order summary detail, and thank you pages.
The following examples show the information displayed based on the choice of shipping method for physical and digital products:
#### Physical Product
*Native SFCC methods only*
Digital River Shipping Quotes methods only
Native SFCC and DR Shipping Quotes methods (both)
#### Digital Product

#### Merchant tools UI enhancement for shipping options user interface
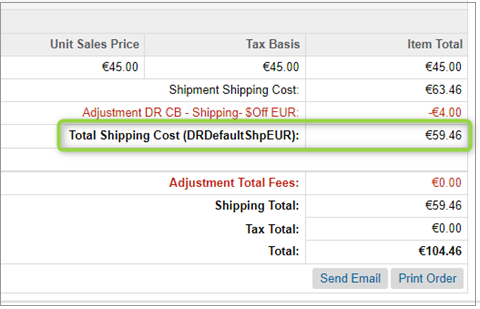
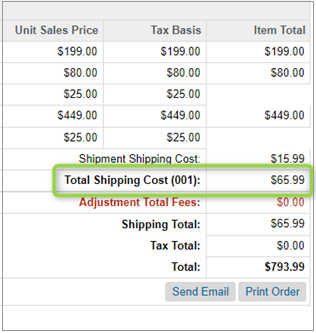
If an order is placed using a Digital River shipping option, the DRDefaultShpXXX shipping method will be displayed. Otherwise, a native SFCC shipping method will be displayed. The following shows examples of how shipping options information is displayed:
*Digital River shipping options only*
Native SFCC shipping methods only
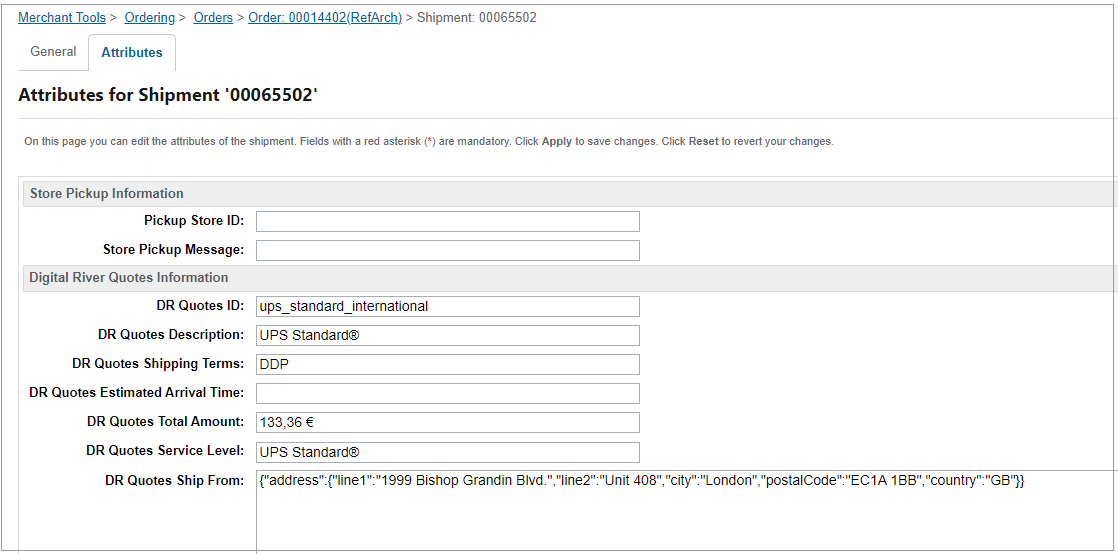
You can view details of the Digital River Shipping Option by navigating to the **Shipment / Attributes** tab:
#### Fixed Pricing Feature
You have the option to set specific price ranges for Digital River shipping options using the fixed pricing feature. When customers visit the Checkout-Shipping page on the storefront, they can view the relevant shipping options along with their fixed prices based on the currency.
Merchants set prices in Business Manager. If no fixed price is set on the Checkout-Shipping page, Digital River Shipping Options gets prices from the shipping-quotes API. If you have set up a Digital River Shipping Option with a fixed price and also added it to the DR Shipping Options—Free Shipping Option setting, then the configurations for the free shipping option will take priority over the fixed price setting.
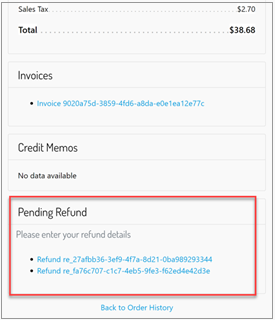
## Offline refunds
The Digital River Salesforce B2C LINK Cartridge allows shoppers to enter their banking details to obtain an offline refund. To use delayed payment methods such as wire transfers and Konbini, the shopper must provide specific banking details to receive the refund.
You can view and provide these details on the Order Detail page. If you have any refunds that require banking information, you can find them in the Pending Refunds section.
Perform the following steps to provide banking details:
1. After logging into the storefront, navigate to the Order Detail Page
2. You see one or more links under the Pending Refunds section. The shopper may be required to enter banking details more than once.\
\
3. Click the first link in the list. The shopper is presented with the form to enter refund banking details.\
\
\
4. Complete the form and click **Submit.** Allow some time for the refund to be processed.
5. If additional pending refunds exist, return to the Order Detail page and repeat these steps.
#### Digital River Global Returns Portal
If you are using Digital River's Global Returns feature, you can enable the Digital River Global Returns Portal Enabled site preference to allow your shoppers to access the global returns portal. After the order has been fulfilled, a link will appear on the shopper's Order Detail page. The shopper can then use this link to initiate a return through the self-service portal.
## Order cancellation/fulfillment
Though order and line-level fulfillment or cancellation within SFCC or an order management system are not within the scope of the current cartridge, it’s necessary to notify Digital River each time such an event occurs. Once notified, Digital River will [capture the payment or cancel the charge](https://docs.digitalriver.com/digital-river-api/order-management/informing-digital-river-of-a-fulfillment). You can do this in two ways:
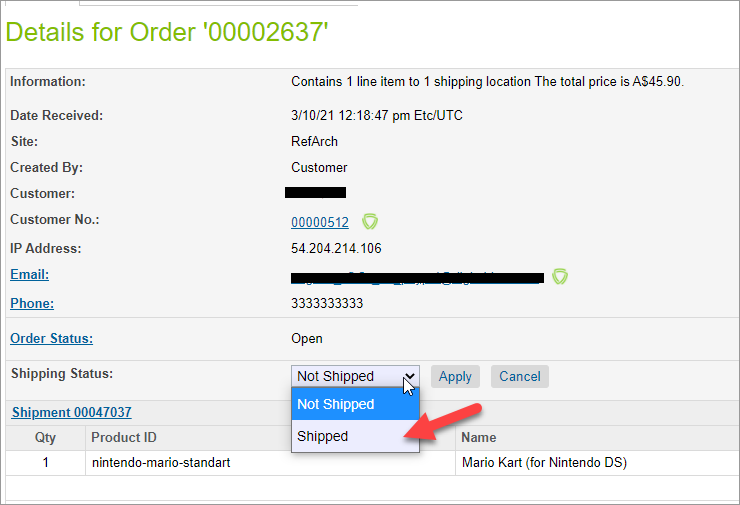
1. Use the [**DigitalRiver\_fulfillOrders**](#order-status-management-jobs) job. This job is available out of the box and provides order-level fulfillment and cancellation. It will choose orders with **Shipped** or **Cancelled** statuses and provide respective fulfillment to Digital River. Line-level fulfillment and cancellation are not included in this job. We recommend that you schedule this job to run on a regular basis.\
In the Business Manager, change the **Shipping Status** to **Shipped** to fulfill the order. \
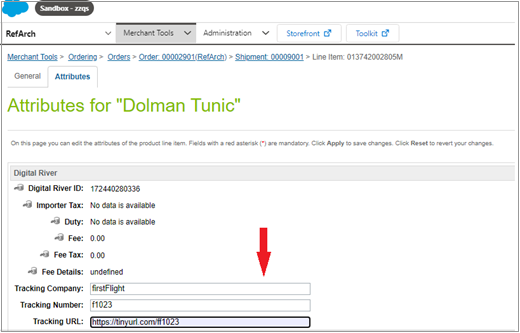
2. To protect against chargebacks, you need transactions containing the tracking company and a tracking number. You can provide the tracking company, tracking number, and tracking URL at the Order item level. \
\
Do this by first selecting an individual item-level shipment record from the order. For each line item in the shipment, provide the information for the tracking company, tracking number, and tracking URL fields. After providing that data, change the **Shipping Status** to **Shipped** to fulfill the order. Note that you should do this before changing the Shipping Status.\
\ \
\
Line items with the same tracking number are grouped and sent to Digital River as a single fulfillment. If the order contains multiple tracking numbers, multiple fulfillments are sent to Digital River. Any line items without a tracking number will be grouped as a single fulfillment.
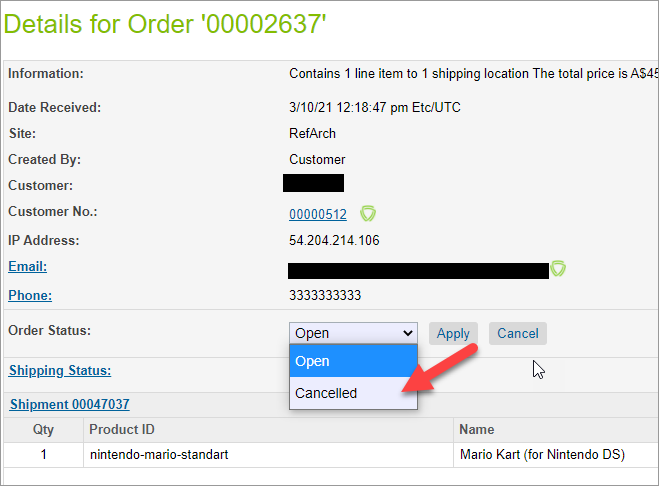
3. To cancel the order, change the **Order Status** to **Cancelled**.\
\
The next time the **DigitalRiver\_fulfillOrders** job runs, the fulfillment or cancellation request will be sent to Digital River.
4. If URL endpoints or third-party integration perform order fulfillment/cancellation, inject the `drOrderHelper` module into the code to send fulfillments to Digital River. To do so, import the module:
```
var drOrderHelper = require('*/cartridge/scripts/digitalRiver/drOrderHelper');
```
And use one of two functions that will create fulfillments at Digital River.
#### drOrderHelper
```
drOrderHelper.notifyOrderFulfillment(order, items);
drOrderHelper.notifyOrderCancellation(order, items);
```
Functions accept two arguments:
* **order**—The updated order number or [actual order](https://documentation.b2c.commercecloud.salesforce.com/DOC1/index.jsp?topic=%2Fcom.demandware.dochelp%2FDWAPI%2Fscriptapi%2Fhtml%2Fapi%2Fclass_dw_order_Order.html\&resultof=%22%63%6c%61%73%73%22%20%22%4f%72%64%65%72%22%20%22%6f%72%64%65%72%22%20) object.
* **items**—Array of order [product line items](https://documentation.b2c.commercecloud.salesforce.com/DOC1/index.jsp?topic=%2Fcom.demandware.dochelp%2FDWAPI%2Fscriptapi%2Fhtml%2Fapi%2Fclass_dw_order_ProductLineItem.html\&resultof=%22%63%6c%61%73%73%22%20%22%50%72%6f%64%75%63%74%4c%69%6e%65%49%74%65%6d%22%20%22%70%72%6f%64%75%63%74%6c%69%6e%65%69%74%65%6d%22%20) or order line items IDs that should be fulfilled. This parameter is provided for partial fulfillment/cancellation.
{% hint style="info" %}
**Note**: At this time, partial line item fulfillments and cancellations are not supported.
{% endhint %}
{% hint style="info" %}
**Note:** When you use the`drOrderHelper.notifyOrderFulfillment` function for physical fulfillment, make sure that the tracking information is provided for the items before calling the function. By doing this, you ensure that Digital River receives the tracking details. On`ProductLineItem`, populate the `drTrackingNumber`, `drTrackingCompany`, and `drTrackingUrl`fields for shipped items.
{% endhint %}
Functions return the [Result](https://documentation.b2c.commercecloud.salesforce.com/DOC1/index.jsp?topic=%2Fcom.demandware.dochelp%2FDWAPI%2Fscriptapi%2Fhtml%2Fapi%2Fclass_dw_svc_Result.html\&resultof=%22%63%6c%61%73%73%22%20%22%52%65%73%75%6c%74%22%20%22%72%65%73%75%6c%74%22%20) of the [Digital River](https://www.digitalriver.com/docs/digital-river-api-reference/#operation/createFulfillments) calls.
## Refunding an order
Refunds are handled through the Digital River Dashboard. From Salesforce, you can access the order record in the Digital River Dashboard by navigating to the Order record and clicking the Payment tab. A link to the Digital River Dashboard is provided in the Payment Method section.
Before you can refund an order, the order must be fulfilled and shipped.
1. Sign in to Salesforce.
2. Click **Merchant Tools** and then click **Orders**. The Orders page appears.
3. Click **Find**.
4. On the **Orders** page, click the order number link under the **Number** column. The Details for the order page appear.
5. Click the **Attributes** tab and scroll down to **Digital River Attributes,** where the webhook displays the retrieved information. The **Digital River Order Status** should be **fulfilled**.
6. Click the **General tab**, and then click the **Shipping Status** link. The **Shipping Status** should be **Shipped**. \
**Note**: If you changed the Digital River **Order Status** to **Fulfilled** or **Shipping Status** to **Shipped**, click **Administration** and then click **Jobs**. From the Jobs page, click **DigitalRiver\_fulfillOrders**, and then click **Run Jobs**. This will send the fulfillment request to Digital River.
7. Click the **Payment** tab and click the Digital River logo under **Payment Method** to go to the Order details page for this order on the Digital River Dashboard. You may need to enter your user credentials to access the Order details page.
8. From the Order details page, scroll down to **Refunds**, click [**Create refund**](https://docs.digitalriver.com/digital-river-api/administration/dashboard/order-management/orders/creating-a-refund), complete the fields, and then click **Review and submit**.
9. Click **Submit** to complete the task.
## Tax-inclusive sites, promotions, and tax identifiers
This section focuses on setting up a workaround for a promotions issue involving tax identifiers resulting in a tax exemption.
A tax identifier applied during checkout can sometimes result in a tax exemption for the shopper. If this is the case, the gross price needs to be reduced by the tax value (known as a Tax Discount) toTax-inclusive synchronize the position price on both platforms (SFCC and Digital River).
The following approach is implemented to calculate this price on the Salesforce Commerce Cloud (SFCC) platform for the gross taxation sites (tax-inclusive sites). The formula is `Net Price = Gross price - Tax`. When the tax changes, the Net price is recalculated, but the Gross price remains constant.
Sometimes, this situation can lead to incorrect promotional price calculations. This topic describes the approach used in the cartridge to fix this issue so that it correctly exempts tax when applicable while not changing the value of applied promotions.
To synchronize prices on both platforms, the following general approach is used:
* The cartridge code handles the total tax discount and is stored as a non-basket item.
* Whenever you must display the total to a customer, the tax discount is subtracted from the order total.
* On the last step of the checkout, just before order creation, the following occurs:
* Absolute discount values are calculated on the last step of the checkout, just before the order is created from the basket
* All price adjustments that the SFCC Promotion Engine added are removed and replaced with one custom `priceAdjustment` with type `amountOff` on both the Order and Line Item level.
* The line item level price adjustment, with the tax discount amount, is added to each line item.
### Make code changes to process the price/tax calculation
These modifications have been added to the cartridge to address this issue and improve the OOTB (out-of-the-box) order creation and checkout experience.
The following specific code changes have been made to handle the price/tax calculation process:
1. Replaced the product line item price adjustments and shipment line item price adjustments with one `amountOff` adjustment.
2. Created an `amountOff` price adjustment and set the amount to the sum of all discounts applied to the item during checkout.
3. Removed all system price adjustments generated by the Promotion engine during the checkout (Applied promotion information is stored in the order notes).
4. Created a custom tax discount adjustment for each product line item and shipping line item, with the line item tax discount amount.
5. Descriptions of all removed discounts have been added to the order notes. The report includes the product ID, the promotion's name, and the promotion discount amount.
6. We kept the Tax Discount as a non-basket item during checkout. It is subtracted from the SFCC basket total to display the correct value to the customer and sent to the Drop-in.
### Understand Basket to Order transition UI changes
You will see the following visual differences between basket and order screens once promotions have been replaced and tax discounts added.
#### Order review page
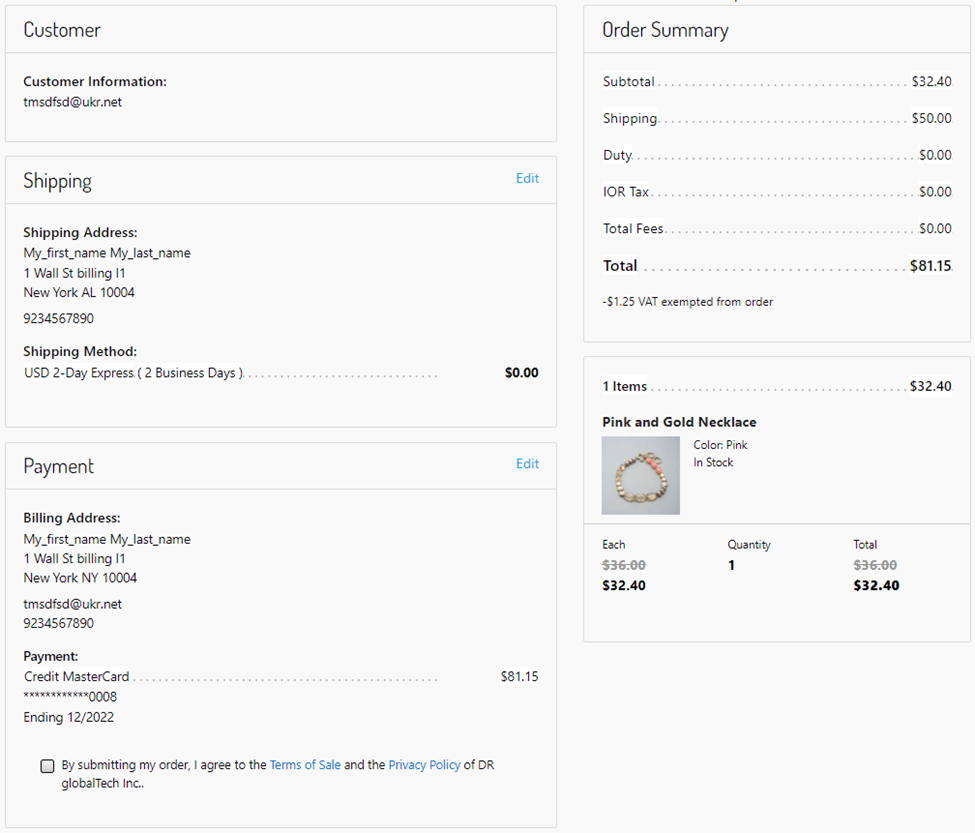
The Tax Discount has not been applied to the basket at this stage, and the SFCC system Line Item level promotions are in place. In this UI example, the sum of **Subtotal** and **Shipping** is greater than the **Total**; this is explained by the text **\** **VAT exempted from order** beneath the **Total**.
#### Thank you page
At this stage, the Line item tax discount has been applied to the product causing a price decrease. Also, the line **Shipping Discount** appears. This SFRA standard reflects any price adjustment applied to the Shipping Line item.
In this UI example, the sum of **Subtotal**, **Shipping,** and **Shipping Discount** is equal to the **Total, equals** which is expected. To notify customers why the prices were changed, you add the text **Prices reflect VAT exemption** below the order **Total**.

 ### Adding a new payment method
The Drop-in payments form with the specific configuration will appear when the customer clicks the **Add New** link in the **My Account** section. The form allows the customer to add a new payment method within Drop-in payments and create a new source.
### Adding a new payment method
The Drop-in payments form with the specific configuration will appear when the customer clicks the **Add New** link in the **My Account** section. The form allows the customer to add a new payment method within Drop-in payments and create a new source.


 2. To protect against chargebacks, you need transactions containing the tracking company and a tracking number. You can provide the tracking company, tracking number, and tracking URL at the Order item level. \
\
Do this by first selecting an individual item-level shipment record from the order. For each line item in the shipment, provide the information for the tracking company, tracking number, and tracking URL fields. After providing that data, change the **Shipping Status** to **Shipped** to fulfill the order. Note that you should do this before changing the Shipping Status.\
\
2. To protect against chargebacks, you need transactions containing the tracking company and a tracking number. You can provide the tracking company, tracking number, and tracking URL at the Order item level. \
\
Do this by first selecting an individual item-level shipment record from the order. For each line item in the shipment, provide the information for the tracking company, tracking number, and tracking URL fields. After providing that data, change the **Shipping Status** to **Shipped** to fulfill the order. Note that you should do this before changing the Shipping Status.\
\  \
\
Line items with the same tracking number are grouped and sent to Digital River as a single fulfillment. If the order contains multiple tracking numbers, multiple fulfillments are sent to Digital River. Any line items without a tracking number will be grouped as a single fulfillment.
3. To cancel the order, change the **Order Status** to **Cancelled**.\
\
\
Line items with the same tracking number are grouped and sent to Digital River as a single fulfillment. If the order contains multiple tracking numbers, multiple fulfillments are sent to Digital River. Any line items without a tracking number will be grouped as a single fulfillment.
3. To cancel the order, change the **Order Status** to **Cancelled**.\
 \
The next time the **DigitalRiver\_fulfillOrders** job runs, the fulfillment or cancellation request will be sent to Digital River.
4. If URL endpoints or third-party integration perform order fulfillment/cancellation, inject the `drOrderHelper` module into the code to send fulfillments to Digital River. To do so, import the module:
```
var drOrderHelper = require('*/cartridge/scripts/digitalRiver/drOrderHelper');
```
And use one of two functions that will create fulfillments at Digital River.
#### drOrderHelper
```
drOrderHelper.notifyOrderFulfillment(order, items);
drOrderHelper.notifyOrderCancellation(order, items);
```
Functions accept two arguments:
* **order**—The updated order number or [actual order](https://documentation.b2c.commercecloud.salesforce.com/DOC1/index.jsp?topic=%2Fcom.demandware.dochelp%2FDWAPI%2Fscriptapi%2Fhtml%2Fapi%2Fclass_dw_order_Order.html\&resultof=%22%63%6c%61%73%73%22%20%22%4f%72%64%65%72%22%20%22%6f%72%64%65%72%22%20) object.
* **items**—Array of order [product line items](https://documentation.b2c.commercecloud.salesforce.com/DOC1/index.jsp?topic=%2Fcom.demandware.dochelp%2FDWAPI%2Fscriptapi%2Fhtml%2Fapi%2Fclass_dw_order_ProductLineItem.html\&resultof=%22%63%6c%61%73%73%22%20%22%50%72%6f%64%75%63%74%4c%69%6e%65%49%74%65%6d%22%20%22%70%72%6f%64%75%63%74%6c%69%6e%65%69%74%65%6d%22%20) or order line items IDs that should be fulfilled. This parameter is provided for partial fulfillment/cancellation.
{% hint style="info" %}
**Note**: At this time, partial line item fulfillments and cancellations are not supported.
{% endhint %}
{% hint style="info" %}
**Note:** When you use the`drOrderHelper.notifyOrderFulfillment` function for physical fulfillment, make sure that the tracking information is provided for the items before calling the function. By doing this, you ensure that Digital River receives the tracking details. On`ProductLineItem`, populate the `drTrackingNumber`, `drTrackingCompany`, and `drTrackingUrl`fields for shipped items.
{% endhint %}
Functions return the [Result](https://documentation.b2c.commercecloud.salesforce.com/DOC1/index.jsp?topic=%2Fcom.demandware.dochelp%2FDWAPI%2Fscriptapi%2Fhtml%2Fapi%2Fclass_dw_svc_Result.html\&resultof=%22%63%6c%61%73%73%22%20%22%52%65%73%75%6c%74%22%20%22%72%65%73%75%6c%74%22%20) of the [Digital River](https://www.digitalriver.com/docs/digital-river-api-reference/#operation/createFulfillments) calls.
## Refunding an order
Refunds are handled through the Digital River Dashboard. From Salesforce, you can access the order record in the Digital River Dashboard by navigating to the Order record and clicking the Payment tab. A link to the Digital River Dashboard is provided in the Payment Method section.
\
The next time the **DigitalRiver\_fulfillOrders** job runs, the fulfillment or cancellation request will be sent to Digital River.
4. If URL endpoints or third-party integration perform order fulfillment/cancellation, inject the `drOrderHelper` module into the code to send fulfillments to Digital River. To do so, import the module:
```
var drOrderHelper = require('*/cartridge/scripts/digitalRiver/drOrderHelper');
```
And use one of two functions that will create fulfillments at Digital River.
#### drOrderHelper
```
drOrderHelper.notifyOrderFulfillment(order, items);
drOrderHelper.notifyOrderCancellation(order, items);
```
Functions accept two arguments:
* **order**—The updated order number or [actual order](https://documentation.b2c.commercecloud.salesforce.com/DOC1/index.jsp?topic=%2Fcom.demandware.dochelp%2FDWAPI%2Fscriptapi%2Fhtml%2Fapi%2Fclass_dw_order_Order.html\&resultof=%22%63%6c%61%73%73%22%20%22%4f%72%64%65%72%22%20%22%6f%72%64%65%72%22%20) object.
* **items**—Array of order [product line items](https://documentation.b2c.commercecloud.salesforce.com/DOC1/index.jsp?topic=%2Fcom.demandware.dochelp%2FDWAPI%2Fscriptapi%2Fhtml%2Fapi%2Fclass_dw_order_ProductLineItem.html\&resultof=%22%63%6c%61%73%73%22%20%22%50%72%6f%64%75%63%74%4c%69%6e%65%49%74%65%6d%22%20%22%70%72%6f%64%75%63%74%6c%69%6e%65%69%74%65%6d%22%20) or order line items IDs that should be fulfilled. This parameter is provided for partial fulfillment/cancellation.
{% hint style="info" %}
**Note**: At this time, partial line item fulfillments and cancellations are not supported.
{% endhint %}
{% hint style="info" %}
**Note:** When you use the`drOrderHelper.notifyOrderFulfillment` function for physical fulfillment, make sure that the tracking information is provided for the items before calling the function. By doing this, you ensure that Digital River receives the tracking details. On`ProductLineItem`, populate the `drTrackingNumber`, `drTrackingCompany`, and `drTrackingUrl`fields for shipped items.
{% endhint %}
Functions return the [Result](https://documentation.b2c.commercecloud.salesforce.com/DOC1/index.jsp?topic=%2Fcom.demandware.dochelp%2FDWAPI%2Fscriptapi%2Fhtml%2Fapi%2Fclass_dw_svc_Result.html\&resultof=%22%63%6c%61%73%73%22%20%22%52%65%73%75%6c%74%22%20%22%72%65%73%75%6c%74%22%20) of the [Digital River](https://www.digitalriver.com/docs/digital-river-api-reference/#operation/createFulfillments) calls.
## Refunding an order
Refunds are handled through the Digital River Dashboard. From Salesforce, you can access the order record in the Digital River Dashboard by navigating to the Order record and clicking the Payment tab. A link to the Digital River Dashboard is provided in the Payment Method section.